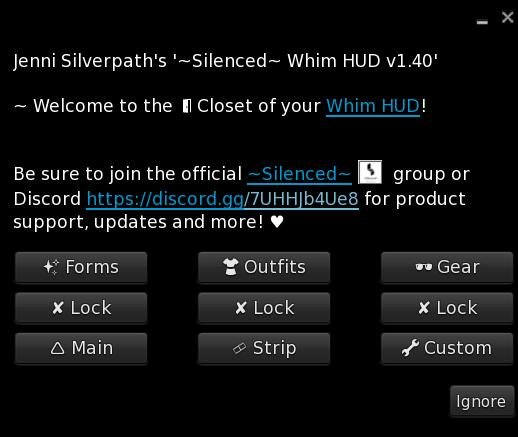
Closet
The most advanced avatar management system in SL. Fast, efficient, and infinitely customizable.

Dress
Locks/unlocks the ability for the user to add/wear items.
Example Image For Folder Setup

Creating Forms
Forms come with a variety of options you can customize individually to each form. (Note: Do NOT use any symbols besides the / for folder paths)

Delete
Discards the changes or deletes the form if it’s an already existing form.
Name
Sets the name of the form.
Anim
Sets the animation that will play when changing into this form. Note: name must match the name of the animation exactly.
Telepathy
Sets the name the user will have when speaking in telepathy channels, which are to communicate with Silenced objects.
Save
Saves the new form or the changes made to an existing form.
Folder
Sets the folder that will be attached when changing into the form. Example: If the form is in my “#RLV/Whim/Amputee ATM” folder, then I would simply put Whim/Amputee ATM into the text box. Note: Form folders should include the base items for that form. For example, if you’re making a human form, then it would include the body/head/skin. Clothing and other stuff will be covered in the rest of the tutorial.
Immobile
Selecting this option will render the user completely immobile when placed into this form. They will not be able to move at all.
Position
This will set the position of the form in the list/menu, starting at 0. Example: if I want this form to be 1st in the menu, then I will input 0 as the position. Inputting 1 will make it second in the list, and so on.
Strip
If enabled, the user will be completely stripped of all attachments and clothing before being placed into this form.
Object
Sets the object that will be rezzed in-world when the user is changed into this form. Note: this will only rez when Whim is not in no-rez mode.
RLV
Allows you to customize the restrictions that will be applied when the user is placed into this form.
Duplicate
Makes a new form that is an identical copy of this form.
Outfits
Each Form can support its own limitless list of outfits.

Changing Outfits
To change outfits, you simply enter the Outfits menu. All outfits for the current Form you’re wearing will show up in a list where you can select one to change into. All other outfits will be removed and the selected one will be attached.
Setting Up Outfits

Create a folder called “Outfits” inside the folder for the Form you want to setup outfits for.
Inside the “Outfits” folder, create individual folders for each outfit.
[Optional Step] Create a naked folder if you want to be able to take off all outfits and be nude. The naked folder must be empty, nothing inside it.
Inside each of those folders, drag the items for the outfit. Example: in my “Pink Bodysuit” outfit folder, I have a link to my pink bodysuit.
Gear
Each Form can support its own limitless list of bondage gear.

Attaching & Detaching Gear

When you enter the Gear menu, you will be presented with a list of Gear items currently setup for the Form you’re currently wearing. To add or remove items, you simply select an item, where you will be presented with a menu with the option to add or remove that particular item.
Setting Up Gear

Create a folder called “Gear” inside the folder for the form you wish to setup gear for.
Inside the “Gear” folder, create individual folders for each gear item.
Inside each individual folder, insert links or copies of the items corresponding to each folder. Example: in my “Ballgag” folder, I have a link to my ballgag.
Custom Item Types
Each Form supports a limitless amount of custom item types, such as hair, hats, or any other items you’d want to add!


Attaching & Detaching Custom Items
When you enter the Custom menu, you will be presented with a list of item types you have created in your “Custom” RLV folder. You can select one, such as “Hair”, to be taken to a menu with a list of all the types of hair you have put in your “Hair” folder. Selecting an item will detach all other items from that folder, then attach it.
Setting Up Custom Items

Create a folder called “Custom” inside the folder for the Form you wish to setup custom items for.
Inside the “Custom” folder, create folders for each type of custom item you wish to setup. Example: “Hair”, “Shoes”, “Thongs”
Inside each of the folders for each type, you will create a folder for each item. Example: in my “Hair” folder, I created three folders for three different types of hair, and in each of those folders, I inserted a link to the hair it corresponds to.
Stripping
A powerful stripping engine that allows you to see every attachment on the user and strip them accordingly

Stripping Items
When you enter the Strip menu, you will be presented with a list of items the user is currently wearing. Selecting an item will strip it off and, if the stripping was successful, present you with the menu once more, with that item removed. If the stripping was unsuccessful, you will be presented with the same menu once again, with that item still included as it was not successfully removed.
Locking
Closet has powerful RLV-enabled locks, enabling you to lock everything from the form, to the outfits, and beyond
Locking Items
In the main Closet menu, you are presented with three separate lock buttons, each corresponding to a different section. ‘Locking’ means to prevent attaching or removing any items.
Left: The left lock button corresponds to Forms. Locking this will lock the currently worn Form, including everything inside its folder but not the subfolders.
Center: The center lock button corresponds to Outfits. Locking this will lock the currently worn Outfit, including everything inside its folder. It will also lock the currently worn Form and enable the previous Lock button.
Right: The right lock button corresponds to Gear. Locking this will prevent the user from attaching or removing any items inside the Gear folder.